You can create a website before you finish your morning coffee. No joke.
With so many AI tools around, you can build your own website fast, even if you’ve never done it before.
Some platforms are perfect if you want to create a business website or a blog website, while others make it easy to make a personal website, or online store.
All you need is a clear goal and the right platform. I’ll walk you through everything step by step so you can create your own website without stress.
Let’s get started.
Step 1: Know Your Goal
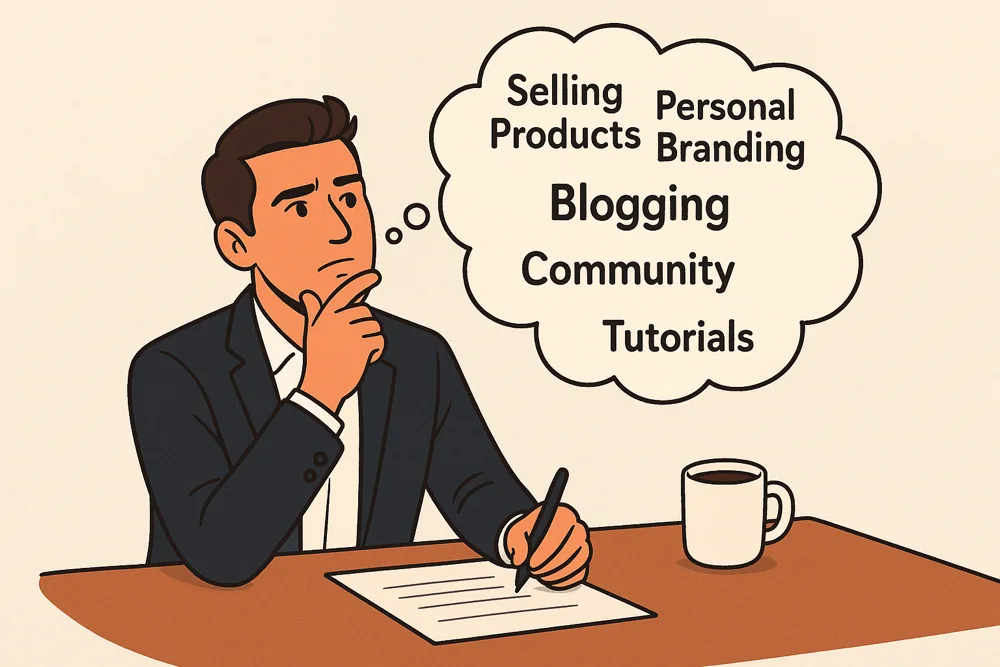
Before you rush to create a website, let’s slow down for a moment and think about something most beginners skip… your goal.
If you don’t set a clear goal, you’ll end up creating a website that looks nice but doesn’t actually work for you.
When I started ThinkMJ my goal was simple. Share what I know, help people make smarter choices online, and keep everything clean and easy to read. My purpose shaped the entire site.
Take Neil Patel’s homepage as an example. The moment you land there, you know exactly what he’s offering. That’s the power of starting with a clear goal before you create your website.

Your goal could be very different, like:
- Sell products online (physical or digital)
- Share business info for customers
- Offer memberships or online courses
- Build a community space
- Grow your personal brand
- Showcase your portfolio to get clients
- Start a blog with tips and guides
And here’s the thing. You don’t have to stick to one. Many successful sites mix goals. Neil Patel sells services while also running a blog to build trust.
Once you’re clear on your goal, every decision becomes easier. You’ll know whether to create a blog website or an online store. You’ll also understand the website creation cost, since your goal decides what features you’ll actually need.
Here’s a quick cheat sheet:
| Goal | Website Type | Key Features |
| Sell products/services | eCommerce site | Product pages, cart, payments |
| Share business info | Informational site | About page, contact form, map |
| Offer courses | Learning platform | Course pages, sign-up, payments |
| Build a community | Membership site | Discussion boards, profiles, events |
| Personal branding | Personal site | Bio, gallery, testimonials |
| Showcase skills | Portfolio site | Project gallery, contact form |
| Share knowledge | Blog/content hub | Blog posts, categories, email opt-in |
Some people use AI tools to create a website for free. Others prefer a more traditional way to make a website with custom coding.
Either way, the best way to build a website is to start with a goal that drives your design, features, and content.
Once you’ve nailed your goal, you can move on to the three key parts of setting up a website:
- Choosing the right platform
- Grabbing your domain name
- And picking reliable hosting
When all three come together, you’re ready to create your website and share it with the world.
Step 2: Choose Your Website Building Platform
The platform you choose is like the foundation of your house. Get it right, and everything runs smoothly. Get it wrong, and you’ll spend time patching cracks later.
When I wanted to build my own website for ThinkMJ, I chose WordPress. Why? Because it gave me flexibility. I could start small, create a blog website, and later grow into tutorials, tools, or even a full online store without starting over. That’s the beauty of picking a platform that grows with you.
But not every project is the same. If I were starting a clothing brand, Shopify might be my choice. It’s designed to create a business website with products, payments, and shipping ready from day one.
Or picture this. You run a pet clinic. You want clients to book appointments, check your services, and maybe read your blog, WordPress makes that easy.
The point is simple: every platform has strengths. Some are perfect for one job. Others, like WordPress, wear many hats.
Here’s a quick guide:
| Platform | Best For | Why Use It |
| Wix | Small business sites, portfolios, blogs | Drag-and-drop builder, beginner friendly |
| Squarespace | Creatives, designers, photographers | Gorgeous templates, simple setup |
| WordPress | Blogs, business sites, eCommerce, portfolios | Highly customizable, works for almost anything |
| Shopify | Online stores | Built-in inventory, payments, shipping |
| Hostinger Website Builder | Beginners who want to create a website fast | AI-powered builder, hosting included |
| Joomla | Advanced business sites, communities | Flexible but requires technical skill |
I’ve tested most of these, and WordPress is hands down the best way to make a website that’s flexible, affordable, and future-proof. It powers over 43% of all sites online, from small personal blogs to huge names like TechCrunch and White House.
That’s why, for the rest of this guide, we’ll stick with WordPress. It’s the best way to build a website if you want to grow without limits.
Step 3: Register Your Domain Name
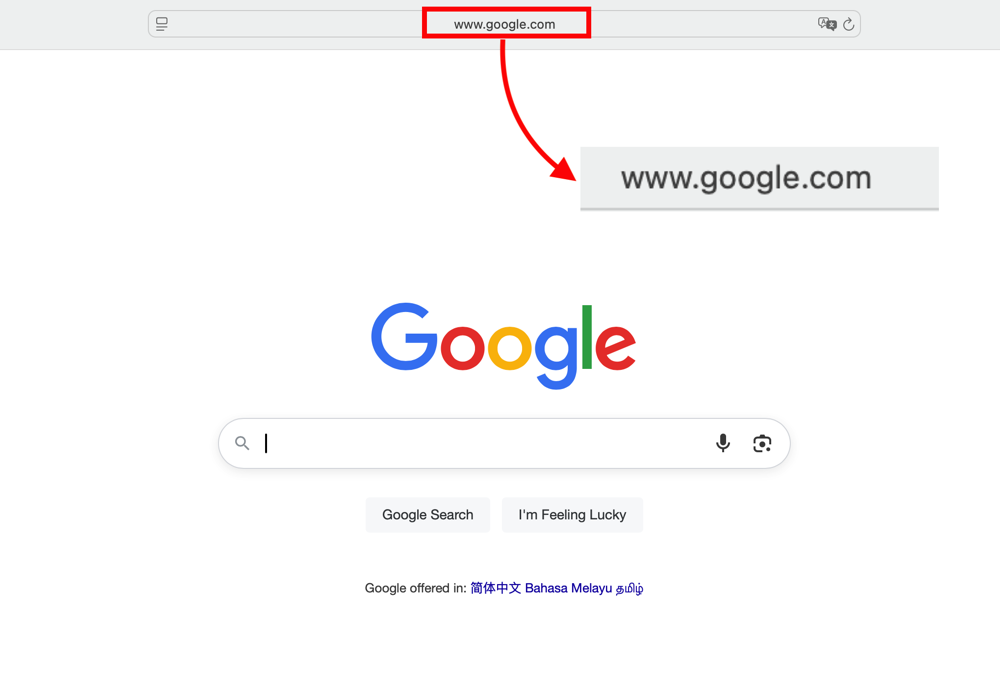
Your domain name is like your home address online. Type in google.com, and you land on Google. Without a domain, no one can find your site, no matter how great it looks.
When you register your domain name, try to keep it close to your business name. If you want to create a business website, matching your domain with your brand:
- Is easy to remember and search online
- Has better SEO visibility when people look for your brand
- Offers consistent brand identity across your site, email, and social profiles
- Builds trust with potential customers
If you’re planning to create a website for free or at least keep costs low, remember the domain itself is one of the few things you usually have to pay for.
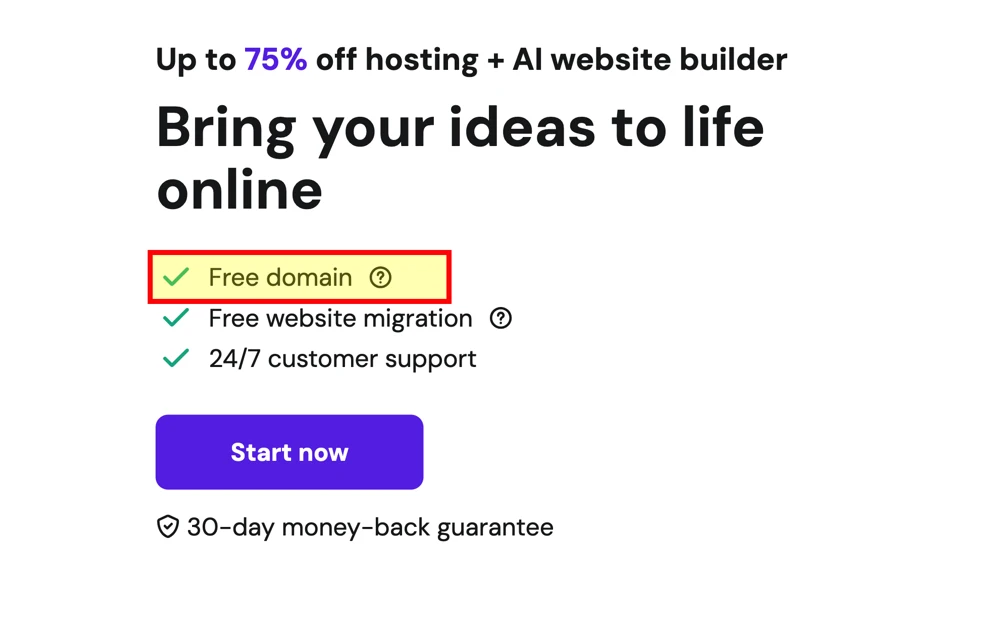
The cost to build a website often starts here, with most domains priced between $10 and $20 per year. Hosting companies like Hostinger or Bluehost sometimes let you register a domain name free for the first year.
When you purchase a domain name, always check for a .com first. It’s still the gold standard. But if you want to create a blog website or a personal site, you might experiment with extensions like .blog or .me.
Want to start a WordPress website for an online store? A .store extension can boost visibility with search engines. Non-profits often stick with .org to show credibility.
Here’s a quick example:
| Goal | Extension | Example |
| Create a business website | .com or .store | mybrand.com, candles.store |
| Create a blog website | .com or .blog | travelblog.com, foodie.blog |
| Create a personal website | .me | johnsmith.me |
| Build a WordPress site for non-profit | .org | helpinghands.org |
To get started, head to a registrar like Namecheap, Domain.com, or Hover. Use their search box to see if your name is available. Once you find one, buy the domain name for at least a year. I recommend registering it for multiple years so you don’t risk losing it.
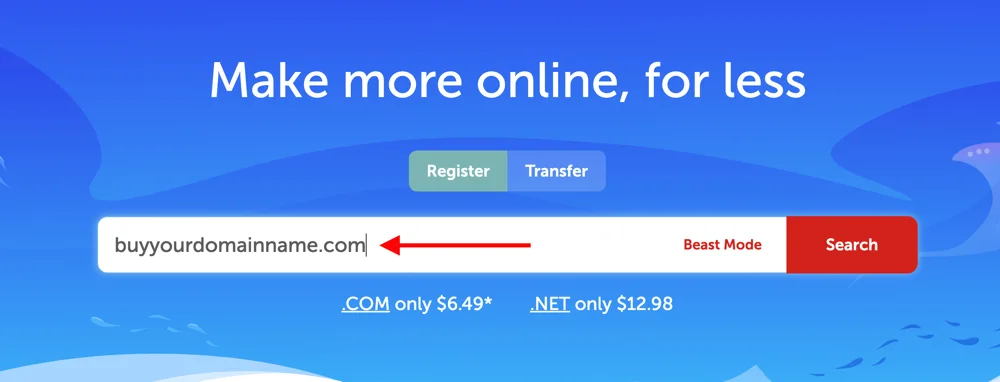
Pro Tip: Even if you’re not ready to build your own website yet, register a domain today. That way it’s yours when you decide to create a WordPress website, build your own website, or even launch a WordPress blog later.
Step 4: Choose a Web Host and Website Builder
When you choose WordPress, you need to host it somewhere. In the case of Wix, Squarespace or others, they take care of hosting for you, but those platforms come with their own limitations.
What is a Web Host
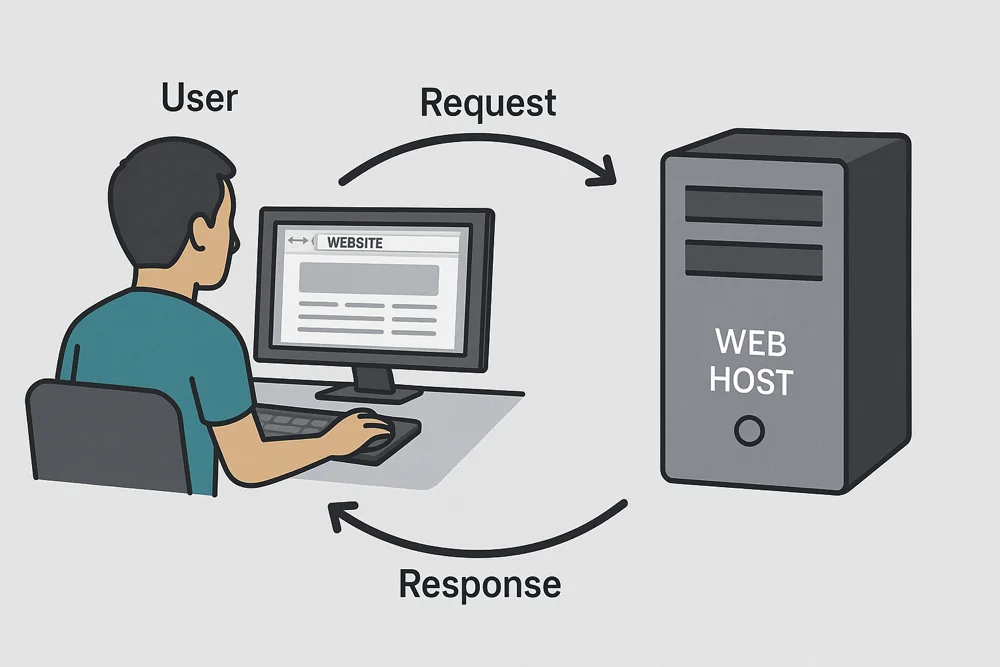
Think of web hosting as your house on the internet. It’s where all your site’s files, images, and code live. When someone types in your URL, their browser connects with your host’s server and pulls up your site.
Technically, you could host a site on your own computer, but it would need to stay on 24/7 and you’d be responsible for all security and maintenance. That’s not practical for most people, so it’s smarter to use professional web hosting services. They keep your site online, secure, and fast while you focus on building.
What Else a Web Host Does Today
Web hosts don’t just store your site anymore. Many now include tools that let you create a website directly on their platform with AI-powered builders. This makes it easy for beginners to build your own website without touching code.
So when you’re picking a provider, here’s what to look for:
- Website Builder: A solid AI website builder so you can create a site quickly.
- Reliability: At least 99.9% uptime so your site stays online.
- Speed: Choose servers close to your audience for faster load times.
- Scalability: Room to grow when traffic picks up.
- Security: SSL certificates, malware protection, regular backups.
- Value: Compare features, storage, bandwidth, and support, not just the price.
Nearly every leading host now allows you to create a website using their built-in website builder. To make your life easy, here are the ones I recommend.
Hostinger
One of the most affordable and beginner-friendly options. You can host your site, register your domain, and use their AI Website Builder to create a website fast.
- Main features: Fast hosting, free SSL, AI site builder, 24/7 support.
- Pricing: Starts at $2.99/month.
- Best for: Small businesses, eCommerce, blogs, portfolios.
SiteGround
Known for excellent customer support and strong performance. Their managed WordPress hosting takes care of updates, security, and speed tweaks.
- Main features: Onboard website builder, free SSL, daily backups, managed WordPress services.
- Pricing: Starts at $3.99/month.
- Best for: Bloggers and small businesses that want speed and support.
ZipWP
This is more than hosting, it’s a WordPress AI website builder. You can create a WordPress website in under a minute, then host and manage it all in one place.
- Main features: AI-powered site creation in 60 seconds, managed WordPress hosting, free SSL, mobile-friendly designs, built-in SEO setup.
- Pricing: Free plan for site creation, premium from $19/month, hosting from $4.95/month.
- Best for: Anyone who wants to build a WordPress site quickly without code.
I use all three for different needs, but for this tutorial, I’ll stick with ZipWP. It’s quick, beginner-friendly, and you can even start free. This way, you can create a website, see if you like it, and then decide whether to host it with them or move it elsewhere.
If you want to see how Hostinger’s website builder works, check out their tutorials. And if you’d like a deeper look at ZipWP, I’ve written a full review.
Step 5: Set Up Your Site with ZipWP
As discussed, ZipWP is an AI website builder that helps you create a WordPress website in no time. Whether you want to launch an online store, or even create a personal website, it builds a solid starting point that you can customize later.
Signing Up is Easy (and Free)
Signup is painless. Just click “Join with Google” or create an account with your email and password. That’s it. No credit card required.
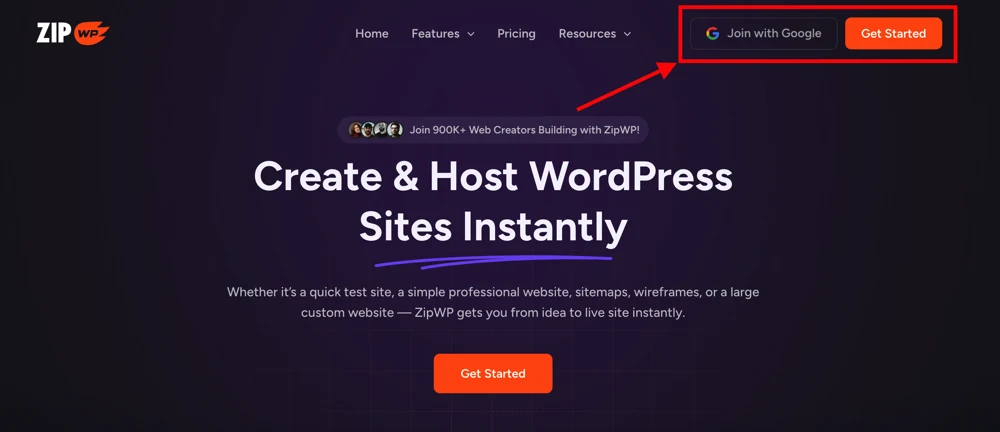
I like this because it removes friction which is why I call it a free website builder that gives you a feel for how your site might look.
Once you’re in, you’ll land on the dashboard. On the left, you’ll see menus for managing and creating sites. On the right, there’s a big “Create New” button. That’s where the magic starts.
When you hit “Create New,” you’ll see a few options:
- Blank Website: start from scratch.
- Complete Website: prebuilt site created in minutes.
- From Blueprint: reuse a predesigned template.
- Custom Site with AI: guided creation powered by AI.
For most beginners, I recommend choosing the Complete Website option. It’s the fastest way to make a business website without getting bogged down in details.
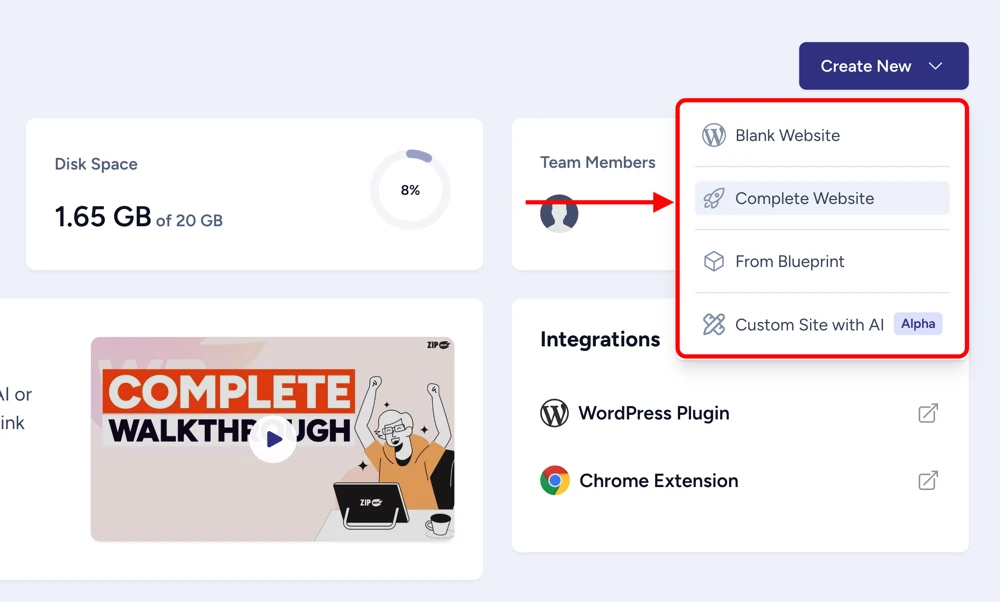
This launches a simple 5-step setup wizard. Let’s walk through it together with an example: Building a Bakery Website.
To show you how smooth this process is, let’s say we’re creating a website for OvenJoy, a home bakery selling fresh breads and cakes.
Note: Although you can create a website for free with ZipWP, I’ll use a premium account to show you advanced features.
Name Your Website
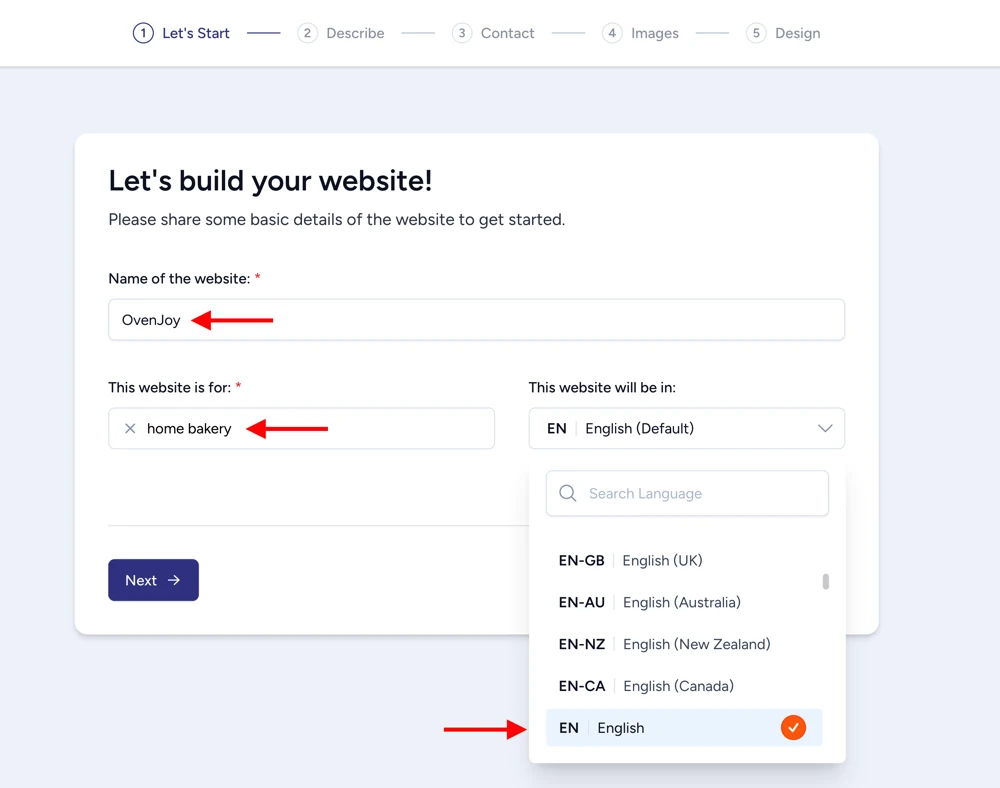
You’ll first enter your site name and purpose. In our case: “OvenJoy – Fresh Homemade Bakery.” You’ll also see optional fields like language and custom subdomain but I suggest sticking to the basics for now.
Describe Your Business
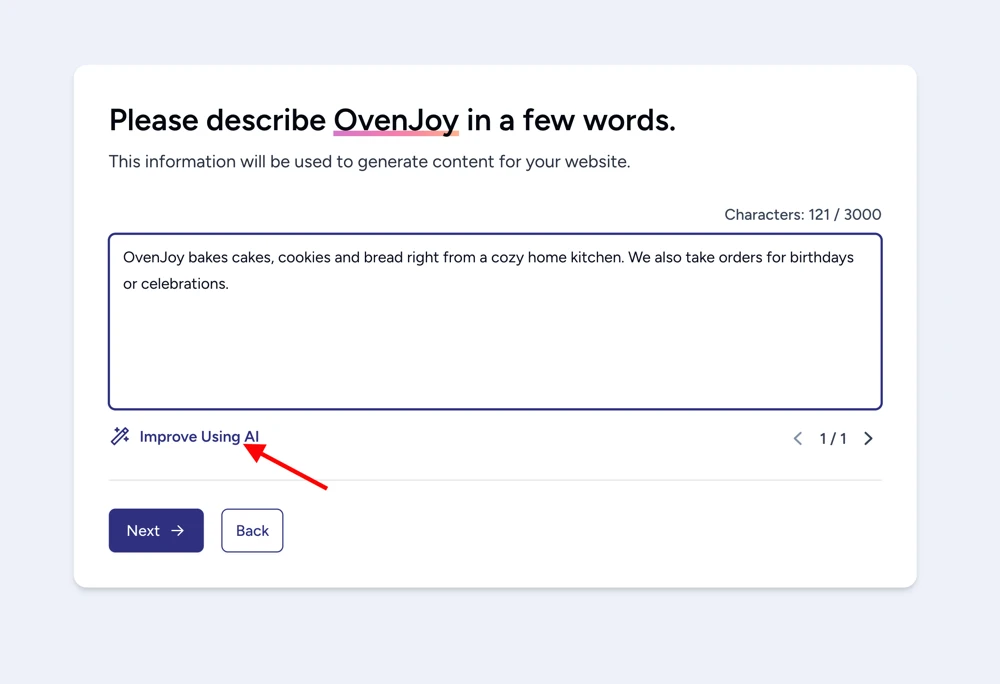
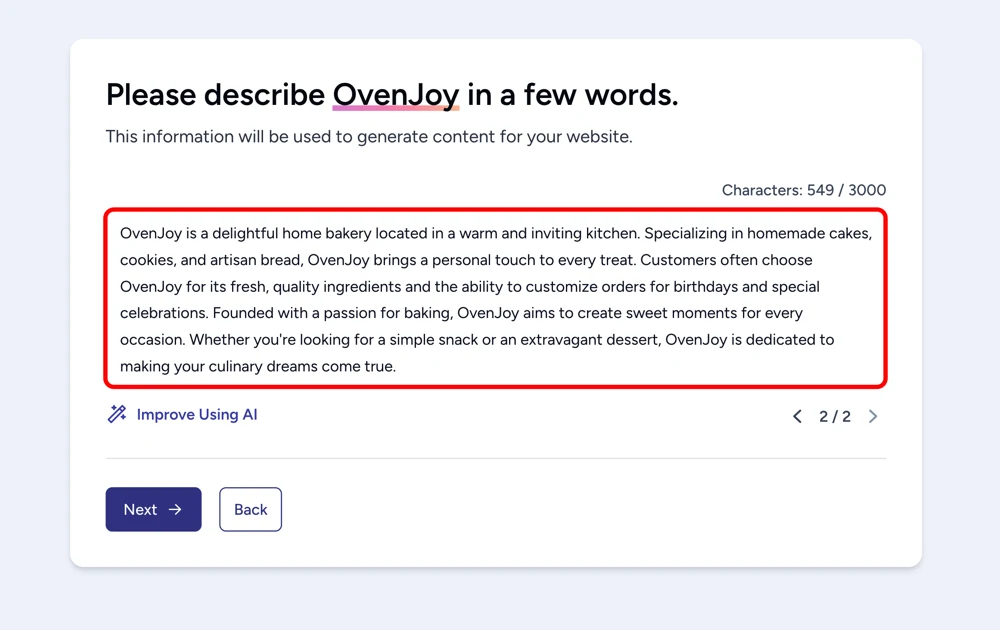
Next, describe what your business does in a few words. Here’s where ZipWP’s AI content writer shines. Hit “Improve Using AI” and it will polish your words into professional copy. You can regenerate or edit manually until it feels right.
Enter Contact Info
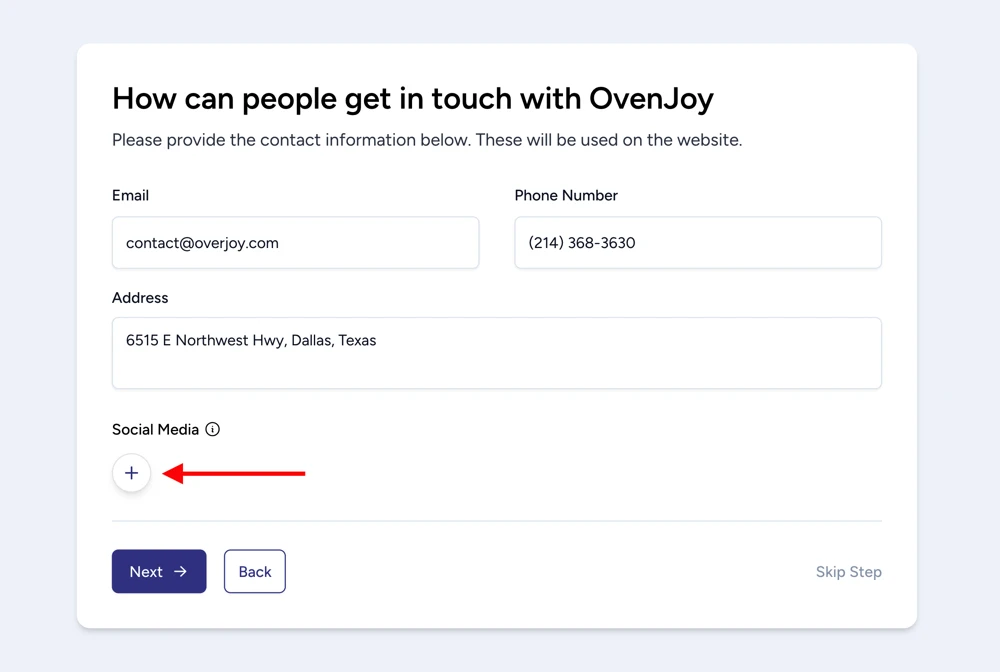
Add your phone number, email, or social handles. If you’re not ready, you can skip this step and add it later.
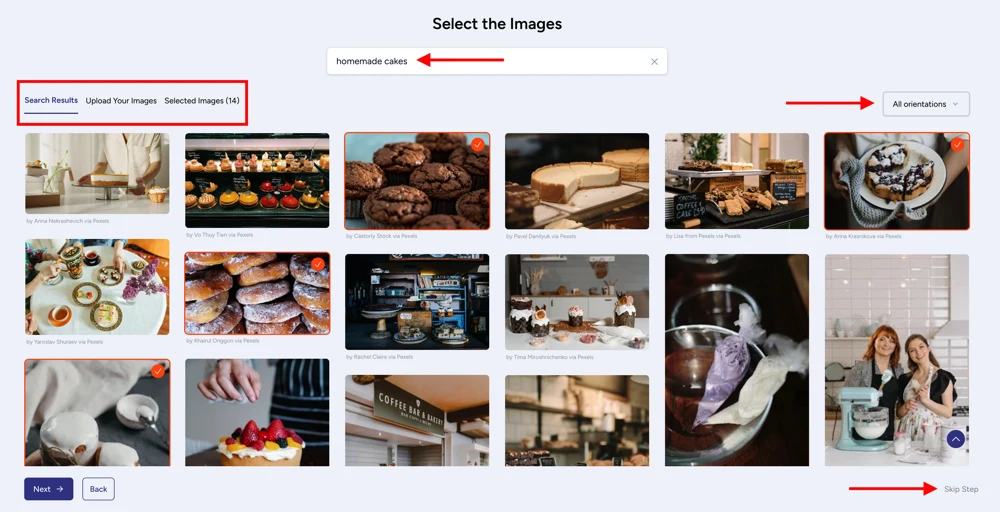
Choose Images
Based on your description, ZipWP suggests high-quality stock photos. For our bakery, it will show images of bread, pastries, and coffee shops. You can filter by orientation, change keywords, or upload your own photos.
Pick a Layout
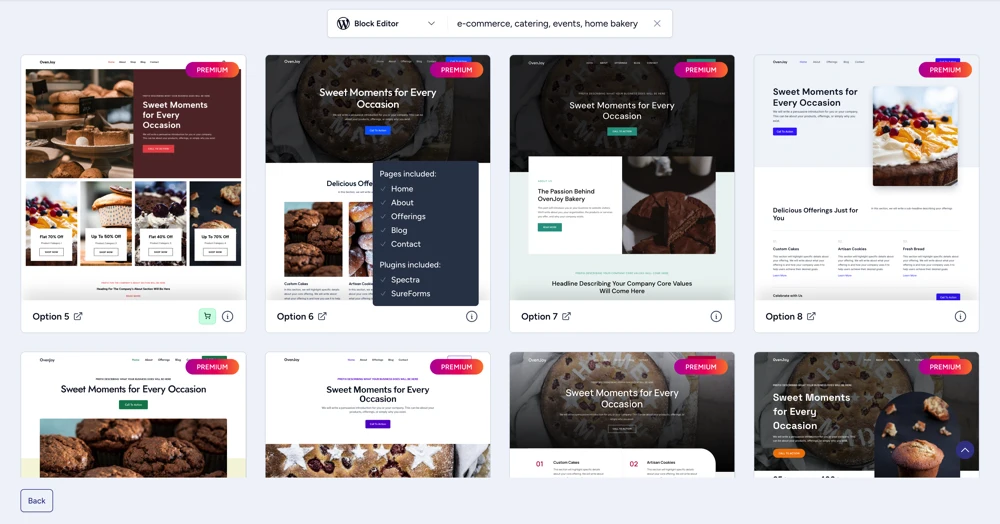
Now comes the fun part. ZipWP creates layouts tailored to your business. Each option includes predesigned pages and plugins. Before you choose a layout, you can:
- Preview layouts
- Switch keywords if you want new suggestions
- Pick between Elementor or Block Editor. (If you go with Block Editor, ZipWP gives you Spectra, a free upgrade that makes editing much easier.)
Once you’ve picked a layout, you’ll move on to styling.
Customize the Look
ZipWP lets you adjust:
- Colors: match your brand identity
- Fonts: choose a style that feels professional or playful
- Logo: upload your logo if you have one
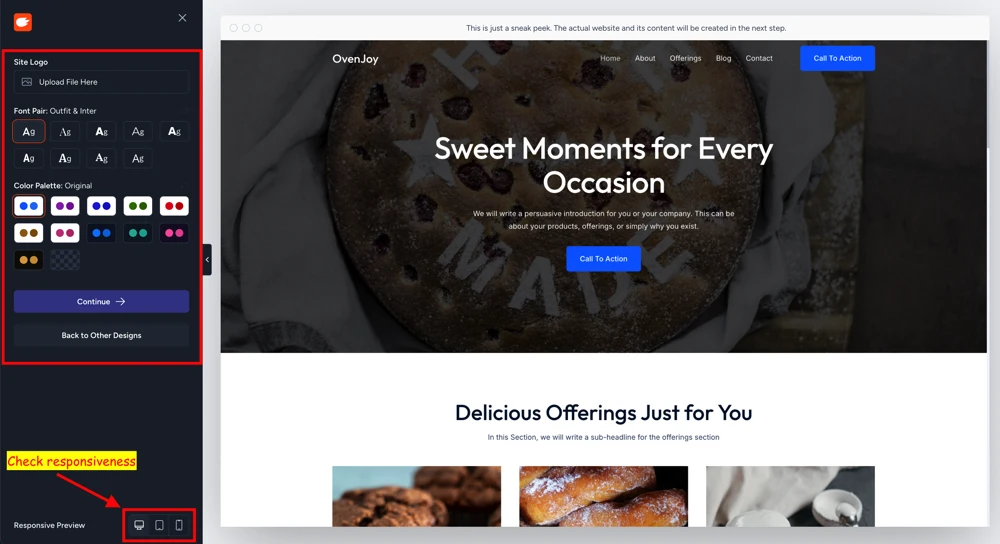
You can even preview everything on desktop, tablet, or mobile, making sure your site looks great everywhere.
Add Essential Features
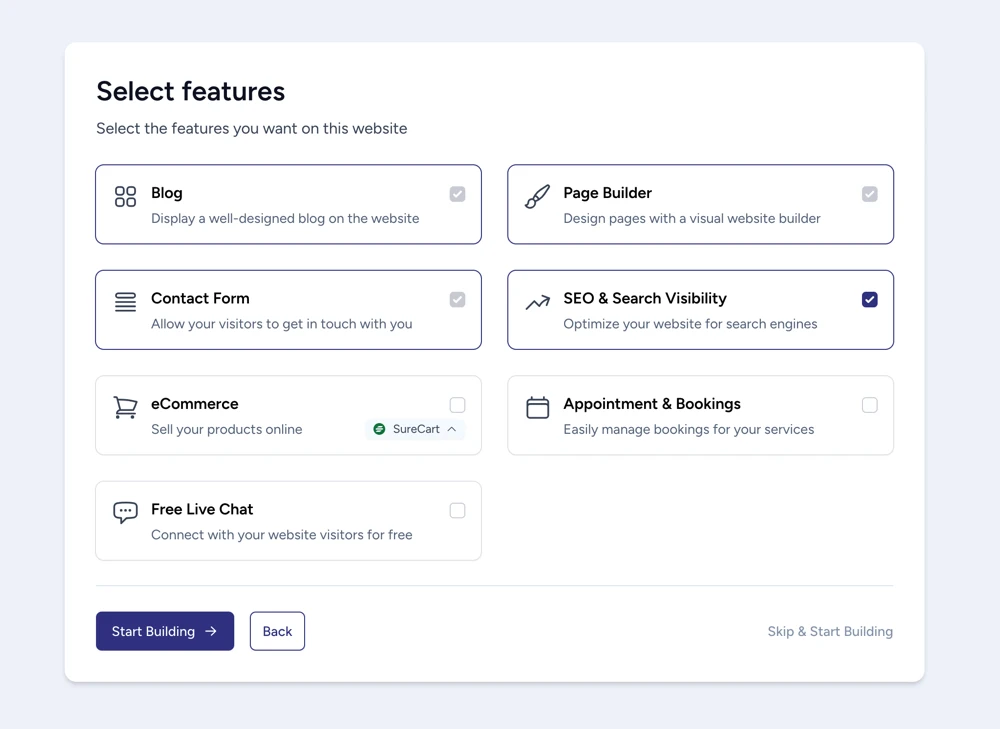
Next, you’ll see advanced features. ZipWP preselects the must-haves WordPress plugins like page builder, contact form, or eCommerce. If you’re planning to sell, you can choose between WooCommerce and SureCart. Both integrate seamlessly, so pick whichever feels simpler.
Review and Launch
Before finishing, you’ll review all your inputs. If something looks off, you can go back and tweak it. Once everything feels right, hit Build My Site.
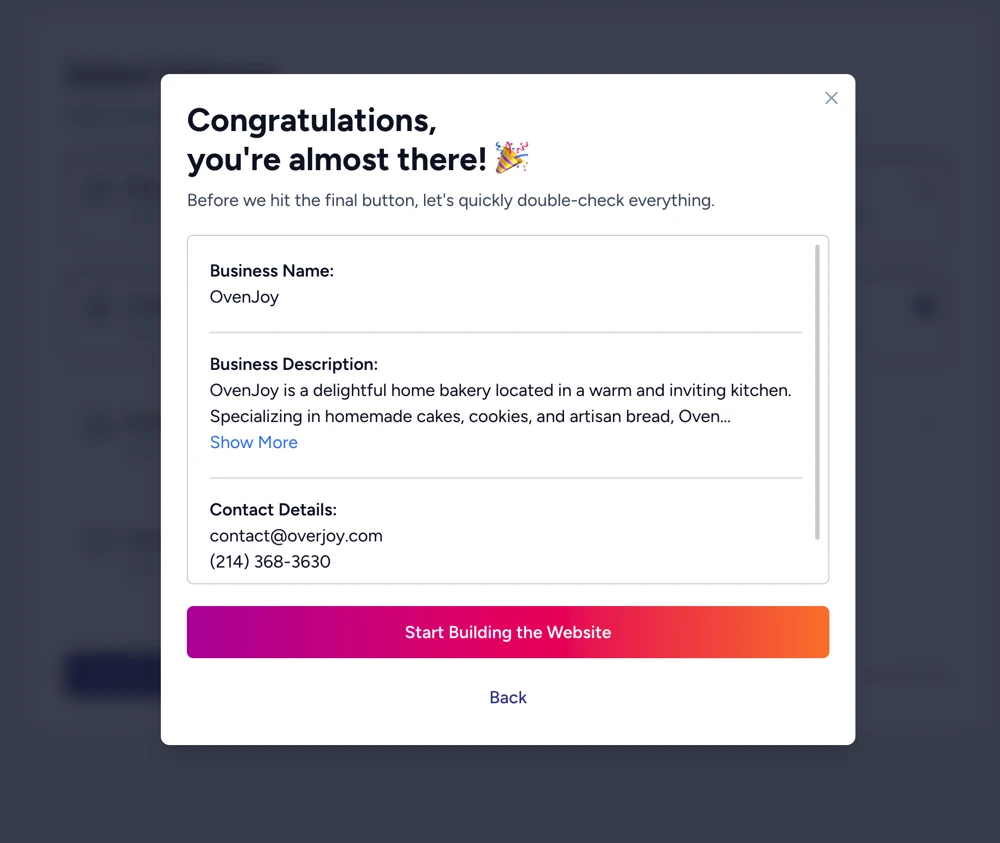
A progress bar will run for a few seconds, and just like that, you’ll have a ready-to-go website. ZipWP then gives you login details and links to your site and dashboard.
Pretty cool, right?
What You Get
In a few minutes, ZipWP has:
- Built a professional, responsive website.
- Added starter pages and content.
- Included images that match your niche.
- Installed the right plugins for functionality.
It’s a full WordPress website builder experience that saves you hours of setup. You can now refine it, add your own text, upload your own photos, and make it truly yours.
Why ZipWP is Beginner-Friendly
Here’s why I recommend ZipWP if you want to create a website fast:
- You can start free, without worrying about the cost to build a website upfront.
- It gives you a strong foundation so you don’t waste time figuring out design and structure.
- It works well whether you’re trying to create a business website, start a WordPress website, or even create a WordPress blog.
Once you’re happy with your site, you can connect it to your hosting plan. If you already picked one of the best web hosting providers like Hostinger or SiteGround, you can move your site there. Or simply stick with ZipWP’s managed hosting if you prefer an all-in-one solution.
Either way, you’ve gone from zero to a live, working site in under an hour. That’s the beauty of using an AI website builder.
Tools and Features ZipWP Adds
One thing I really like about ZipWP is that it sets you up with some of the most trusted WordPress themes and plugins right from the start. Here’s what it added to our test site:
Astra WordPress Theme
ZipWP installs the free version of Astra theme, which is one of the most popular and best WordPress themes out there. With over 1.8 million downloads, Astra is lightweight, fast, and works for almost any type of site. The free version is more than enough to help you create a website quickly, but if you ever want complete control over headers, footers, and advanced design settings, Astra Pro takes it up a notch.
Spectra Page Builder
You also get Spectra page builder, which is an upgrade to the default WordPress block editor. It makes customization super easy with drag-and-drop controls. You can move elements around, tweak layouts, and even build advanced designs without touching code. ZipWP adds the free version but the pro version unlocks ready-made templates, dynamic content, and more advanced features.
SureForms (Contact Form Plugin)
It’s a beginner-friendly WordPress contact form plugin with a clean drag-and-drop interface. Whether you want a simple email form, a feedback form, or even conversational forms, SureForms makes it easy. It’s the kind of contact form plugin you can set up in minutes.
SureRank (WordPress SEO Plugin)
SureRank is a new but lightweight SEO plugin designed for beginners. Unlike other bulky tools, it handles most tasks automatically so you don’t have to fiddle with endless settings. It’s built with modern SEO needs in mind, making it a reliable option for new sites.
These aren’t the only tools you can use. As you grow, you can install more plugins or swap them out for alternatives. But the great thing about ZipWP is that it gives you a clean starting point with trusted tools built by Brainstorm Force, the team behind many high-quality WordPress products.
Next, let’s do some basic settings to get your site ready to go live.
Basic Settings
When you create a WordPress website, the first thing you’ll want to do is adjust a few basic settings so your site reflects your goals. Think of it like setting up the foundation before decorating your house.
Here’s what you’ll be handling:
- Logo
- Title and tagline
- URL structure
- Heading and font sizes
- Button styles and other small details
ZipWP doesn’t make these choices for you, but it gives you a simple interface where you can tweak them without hassle. After you create a website with ZipWP, you’ll land on the Finish Setup page inside your WP Admin.
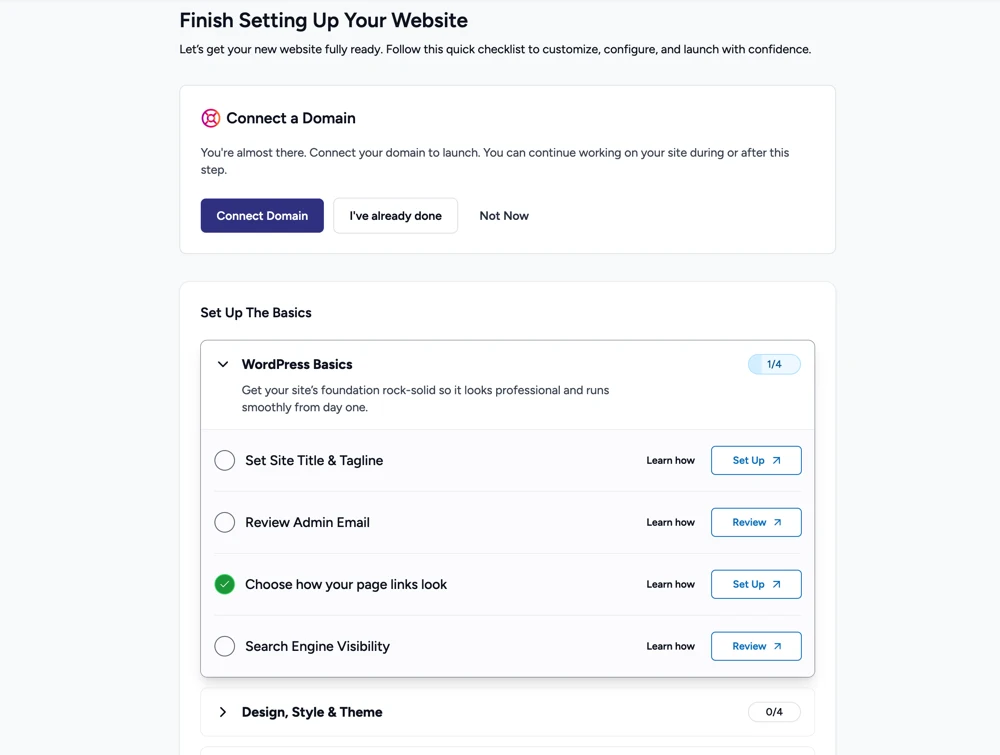
This page has two parts: Connect a Domain and Set Up the Basics. Start with the basics before worrying about the domain.
Inside the Basics section, you’ll find four subpages, each covering different settings. Every item has a “Learn How” link and a “Set Up” button. For example, if you click Set Title & Tagline, it will take you straight to the right page. You’ll see two fields where you can enter a suitable title and tagline for your site. Once you’re happy, hit Save.
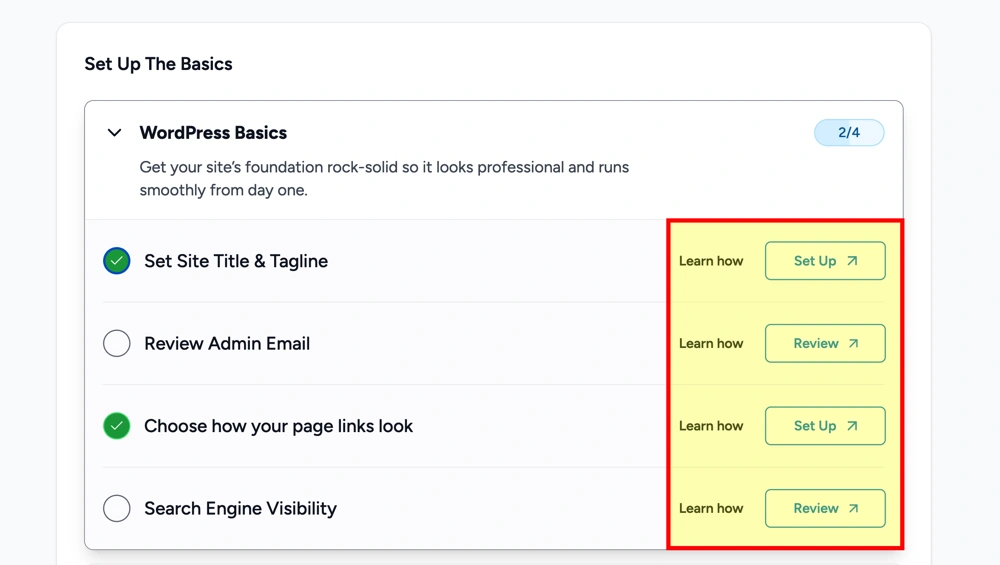
Repeat the process for all the options.
If you ever feel stuck, ZipWP provides quick video tutorials right on the page, so you don’t need to leave the dashboard.
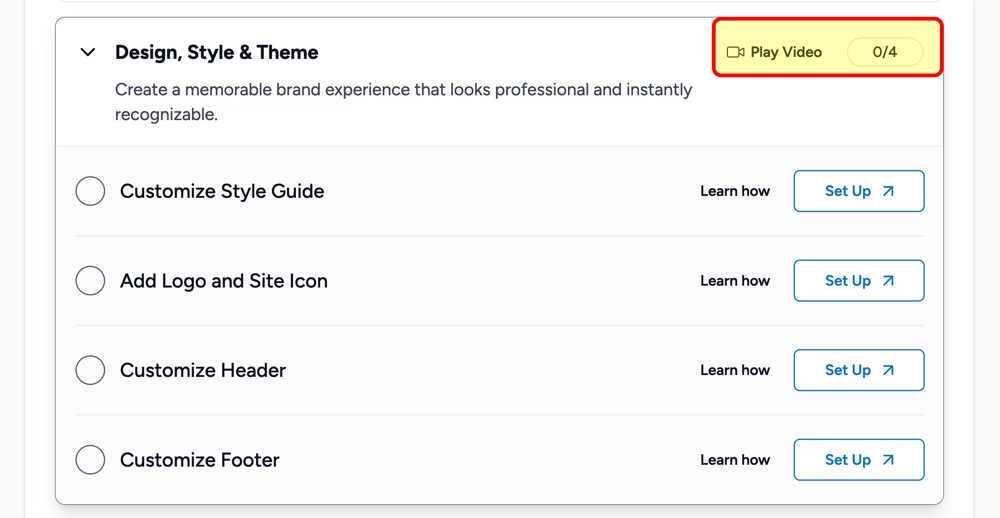
Once you’ve completed the basics, it’s time to think about your domain. If you’re still experimenting or adding content, you can stick with the temporary URL for now. This is especially handy if you’re a designer building a site for a client. You can let them review everything first, then connect the domain when they’re ready.
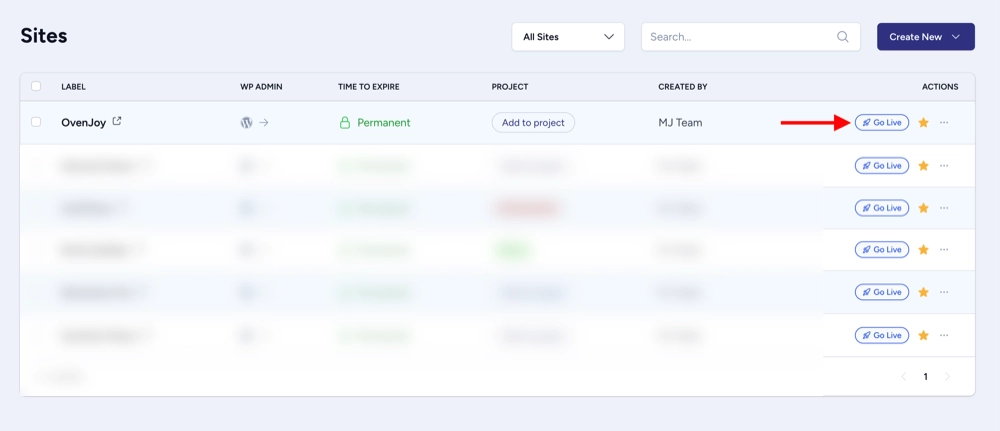
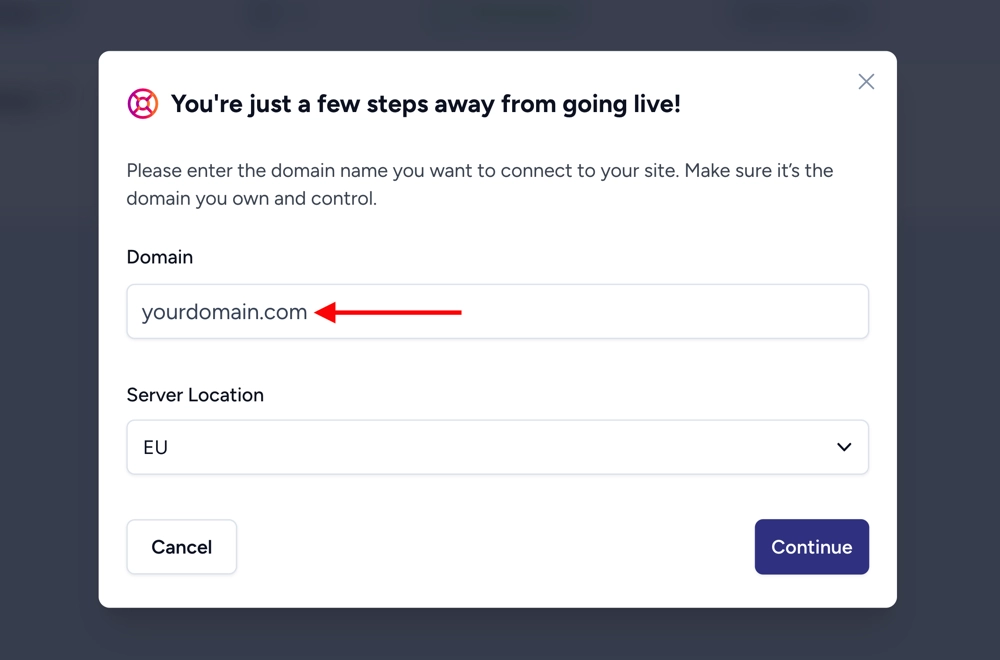
When it’s time to go live, just hit the Connect Domain button on the Finish Setup page. You’ll be redirected to your Staging Sites in the ZipWP dashboard. From there, click Go Live to open a popup, enter your domain, and follow the steps.
You’ll need to verify ownership by adding ZipWP’s nameservers to your domain registrar. That connects your domain to your website hosting and makes your site live on the web.
And that’s it. Congratulations, you’ve just learned how to create a WordPress website and take it live. If you’re building a business site, these steps are the same. You simply tweak the basics to fit your brand. Once done, your business website is ready to grow.
Final Thoughts
At the end of the day, creating a website isn’t about fancy tools, it’s about clarity.
If you know your goal, whether you want to create a business website to sell products or simply share your story, the process becomes much easier.
ZipWP makes this journey smoother by giving you a ready-to-go foundation. In minutes, you can create a WordPress website that looks professional and is flexible enough to grow with your ideas.
So, take that first step. Create a website today, experiment, and let it evolve with your business or personal goals. The sooner you start, the sooner your site starts working for you.
FAQs
How do I create a business website?
To create a business website, start by defining your goal. Do you want to sell products, showcase services, or simply share business info? Once you’re clear, the next step is picking a platform. WordPress is one of the best ways to create a business website because it’s flexible and grows with you. Pair it with the best WordPress theme that matches your style, add a contact form plugin so customers can reach you, and use a WordPress SEO plugin to help your site rank. With a solid domain and reliable hosting, you’ll be ready to go live.
How can I create a website using WordPress?
Creating a WordPress website is simpler than most people think. First, choose hosting and register your domain. Then install WordPress (many hosts do this in one click). Once you’re in, pick a theme that fits your purpose, whether it’s a blog, portfolio, or business site. To customize, use a page builder like Elementor or Spectra. Add essentials like a WordPress contact form so people can reach out and an SEO plugin to handle the basics of search optimization. In just a few hours, you can build your own website that looks professional and works exactly how you need.
Can I create a website for free?
Yes, you can create a website for free, but it usually comes with limits. Free plans often give you a subdomain (like yoursite.wordpress.com), ads on your pages, and fewer customization options. If you just want to experiment, go ahead and try it. But if you’re serious about growing, investing in a custom domain and affordable hosting is the best way to create a website that looks professional and builds trust.
How do I create a website to sell products?
To make a website that sells products, you’ll need an eCommerce setup. With WordPress, you can install WooCommerce or SureCart to manage products, carts, and payments. Start by adding product pages with clear photos and descriptions, then set up payment gateways like Stripe or PayPal. Don’t forget essentials like SSL for secure checkouts and a contact form plugin for customer questions. The cost to build a website for selling products is usually higher than a simple blog, but WordPress makes it affordable compared to custom coding.
What does it take to make a simple website?
Making a simple website takes three main things: a domain name, hosting, and a builder. If you’re using WordPress, you’ll choose a clean theme, add a few pages like About, Contact, and Home, then publish. Tools like page builders make it easy to drag and drop your design without coding. Add a contact form plugin so people can connect with you, and use a WordPress SEO plugin so search engines can find you. Honestly, with today’s tools, the best way to build a website is to keep it simple at first and expand later.
Can I build my own website without hiring someone?
Absolutely. Today’s tools are designed so you don’t need a developer for every little thing. Platforms like WordPress let you build your own website with themes, plugins, and page builders. You can create a personal website, a business site, or even an online store on your own. Hiring someone only makes sense if you want advanced customization or don’t have time to manage it yourself. Otherwise, you’ve got everything you need to make a WordPress website from scratch.
How do I create a blog with WordPress?
To create a WordPress blog, install WordPress, choose a blogging theme, and add a blog page. You can use Elementor or Spectra as a page builder to design it easily. Add categories to organize your posts and install a WordPress SEO plugin to help your blog rank in Google. If you’re starting a travel blog, a news site, or a personal diary, WordPress has everything you need. You can even add a contact form plugin so readers can reach out or subscribe to updates.
How do I make an online store with WordPress?
If you want to make an online store with WordPress, WooCommerce is the go-to plugin. It lets you add products, manage inventory, and process payments. Start by picking a theme built for eCommerce, then add essentials like product filters, a secure checkout, and shipping options. For trust, use SSL certificates and display clear contact info with a contact form plugin. With the right theme and SEO plugin, your store can look polished and attract customers quickly.
How do I create a betting site with WordPress?
Creating a betting site with WordPress is more complex. You’ll need specialized plugins or custom development to handle bets, user accounts, and payment systems securely. First, check the legal requirements in your country, since betting sites are regulated. From there, build your WordPress site using a strong hosting provider, the best WordPress theme for your niche, and a developer to set up the betting functions. WordPress itself can handle the design, SEO plugin setup, and contact form plugin for support, but the betting functionality requires expertise.
